> ## Documentation Index
> Fetch the complete documentation index at: https://docs.restate.dev/llms.txt
> Use this file to discover all available pages before exploring further.
# Connecting services to Restate Cloud
> Learn how to connect your services to Restate Cloud.
export const GitHubLink = ({url}) =>
;
When using Restate Cloud, you can run your services anywhere: on Kubernetes, as serverless functions, on AWS Lambda, or in private environments.
The only requirement is that your services need to be reachable from Restate Cloud's infrastructure.
You can connect your services to Restate Cloud in several ways, depending on where they run:
* Connect [Kubernetes services](/cloud/connecting-services#kubernetes-services) via a secure tunnel with Restate Operator.
* Connect [serverless functions (Vercel, Cloudflare Workers, Deno Deploy, etc.) or other public endpoints](/cloud/connecting-services#serverless-functions-and-other-public-endpoints), by signing requests with your cloud environment's public key.
* Connect [AWS Lambda functions](#aws-lambda-functions), by granting Restate Cloud permission to assume a role in your AWS account.
* Connect [services in private environments](#services-in-private-environments), by setting up a tunnel.
If you prefer a video walkthrough, check out this webinar on getting started with cloud:
## Kubernetes services
You can connect your Kubernetes services to Restate Cloud using a secure tunnel provided by the Restate Operator.
This allows you to run your services inside a private Kubernetes cluster without exposing them to the public internet.
The operator will:
* Establish a tunnel to Restate Cloud
* Register your services automatically
* Manage multiple deployment revisions
* Scale down old revisions when no longer needed
Try connecting a greeter service on a local kind Kubernetes cluster to Restate Cloud by following this [guide](/guides/connecting-k8s-services-to-cloud).
### Operator deployment
Install the Restate Operator via Helm:
```bash theme={null}
helm install restate-operator \
oci://ghcr.io/restatedev/restate-operator-helm \
--namespace restate-operator \
--create-namespace
```
To install the operator, you need to be able to create namespaces and CRDs.
### Create a Restate Cloud secret
Create an API key via `Developers` tab of the Restate Cloud UI and give it `Full` permissions.
The API key starts with `key_`. Save it in a file named `token` and create the secret in Kubernetes:
```bash theme={null}
kubectl create secret generic my-cloud-environment-secret \
--from-file=token=./token -n restate-operator
```
### Set up a secure tunnel
Set up a secure tunnel between the Kubernetes cluster and Restate Cloud with the `RestateCloudEnvironment` CRD:
```yaml theme={null}
apiVersion: restate.dev/v1beta1
kind: RestateCloudEnvironment
metadata:
name: my-cloud-environment
spec:
environmentId: env_...
signingPublicKey: publickeyv1_...
region: eu
authentication:
secret:
name: my-cloud-environment-secret
key: token
```
* The `environmentId` can be found in the Restate Cloud UI in the top left corner when you select your environment.
This ID starts with `env_`.
* The `signingPublicKey` can be found in the Restate Cloud UI under `Developers`. Scroll down to the `Security` section to find the public key under `HTTP endpoints`.
The public key starts with `publickeyv1_`.
* Set the `region` field to the region your Restate Cloud environment is hosted in. Possible values are `us` and `eu`.
You can find the region next to your environment ID in the Restate Cloud UI.
To see all the available configuration options for the `RestateCloudEnvironment` resource, refer to the Custom Resource Definition (CRD): [Pkl](https://github.com/restatedev/restate-operator/blob/main/crd/RestateCloudEnvironment.pkl) (recommended) or [YAML](https://github.com/restatedev/restate-operator/blob/main/crd/restatecloudenvironments.yaml).
[Learn more about how the tunnel works below.](/cloud/connecting-services#how-does-the-tunnel-work)
### Create your RestateDeployment
Create a `RestateDeployment` manifest for your service, as described in the [deployment documentation](/services/deploy/kubernetes#deployment-with-restate-operator), and specify the cloud environment to register with in the `spec`:
```yaml theme={null}
spec:
restate:
register:
cloud: my-cloud-environment
```
Once you apply the manifest, the Restate Operator will set up the secure tunnel and automatically register your service with Restate Cloud.
## Serverless Functions and other public endpoints
Restate can invoke your services over the public internet.
This is useful if you are deploying your services as serverless functions, e.g. on Vercel, Cloudflare Workers, or Deno Deploy.
You can also securely deploy Restate services you operate as directly reachable endpoints.
For AWS Lambda, please see the [AWS Lambda functions](#aws-lambda-functions) section below.
It is important to secure access to your publicly routable services so that only the designated Restate environment can call them.
The easiest way to do this is with Restate's native request identity feature.
All requests to your service will be signed with a unique environment-specific private key.
The Restate SDK will reject any requests that do not have a valid signature.
You can find your cloud environment's public key in the Cloud UI's Developers tab under Security -> HTTP Services.
Since it is not secret, it is safe to include the public key directly in your service source code or configuration files:
```typescript TypeScript {"CODE_LOAD::ts/src/develop/serving.ts#identity"} theme={null}
restate.serve({
services: [myService],
identityKeys: ["publickeyv1_w7YHemBctH5Ck2nQRQ47iBBqhNHy4FV7t2Usbye2A6f"],
});
```
```java Java {"CODE_LOAD::java/src/main/java/develop/ServingIdentity.java#here"} theme={null}
import dev.restate.sdk.auth.signing.RestateRequestIdentityVerifier;
import dev.restate.sdk.endpoint.Endpoint;
import dev.restate.sdk.http.vertx.RestateHttpServer;
class MySecureApp {
public static void main(String[] args) {
var endpoint =
Endpoint.bind(new MyService())
.withRequestIdentityVerifier(
RestateRequestIdentityVerifier.fromKeys(
"publickeyv1_w7YHemBctH5Ck2nQRQ47iBBqhNHy4FV7t2Usbye2A6f"));
RestateHttpServer.listen(endpoint);
}
}
```
```kotlin Kotlin {"CODE_LOAD::kotlin/src/main/kotlin/develop/ServingIdentity.kt#here"} theme={null}
import dev.restate.sdk.auth.signing.RestateRequestIdentityVerifier
import dev.restate.sdk.http.vertx.RestateHttpServer
import dev.restate.sdk.kotlin.endpoint.endpoint
fun main() {
RestateHttpServer.listen(
endpoint {
bind(MyService())
requestIdentityVerifier =
RestateRequestIdentityVerifier.fromKeys(
"publickeyv1_w7YHemBctH5Ck2nQRQ47iBBqhNHy4FV7t2Usbye2A6f",
)
})
}
```
```python Python {"CODE_LOAD::python/src/develop/serving.py#identity"} theme={null}
app = restate.app(
services=[my_service],
identity_keys=["publickeyv1_w7YHemBctH5Ck2nQRQ47iBBqhNHy4FV7t2Usbye2A6f"],
)
```
```go Go {"CODE_LOAD::go/develop/serving.go#identity"} theme={null}
if err := server.NewRestate().
Bind(restate.Reflect(MyService{})).
WithIdentityV1("publickeyv1_w7YHemBctH5Ck2nQRQ47iBBqhNHy4FV7t2Usbye2A6f").
Start(context.Background(), ":9080"); err != nil {
log.Fatal(err)
}
```
You can find more information on how to deploy Restate to various serverless platforms in the following guides:
* [Vercel](https://docs.restate.dev/services/deploy/vercel)
* [Cloudflare Workers](https://docs.restate.dev/services/deploy/cloudflare-workers)
* [Deno Deploy](/services/deploy/deno-deploy)
Note that, if you are using public endpoints, HTTPS must be used between Restate and your services. Consider using a load balancer like AWS Network Load Balancer which handles TLS termination. For optimum performance, the load balancer in front of your services must support HTTP/2.
## AWS Lambda functions
Restate Cloud can securely invoke your AWS Lambda functions by assuming an AWS role which you manage, and has appropriate permissions to invoke the relevant functions.
### Setting up the invoker role
Restate Cloud must be able to assume an AWS role with permission to perform `lambda:InvokeFunction`, within the same AWS account where the Lambda function is deployed. As Restate Cloud is a multi-tenant system, the role must be set up to only allow specifically enumerated Restate Cloud environment(s) you trust to assume it.
Note that the Restate Cloud role is separate from your Lambda function’s execution role.
The execution role is used by your function to perform its tasks, while the invoker role grants Restate Cloud permission to invoke your service handler functions — and nothing else.
You can set up the role directly in IAM or use an infrastructure-as-code tool such as AWS CDK to define it.
If your Lambda has an appropriate trust policy, you do not
need to secure incoming requests any further. If you choose to however, the
identity verification checks will work on Lambda endpoints as well.
#### IAM trust policy for Restate Cloud
To create a new IAM role, you can copy the trust policy directly from the Restate Cloud UI, by visiting [Developers > Security > AWS Lambda](https://cloud.restate.dev/to/developers/integration#lambda).
The trust policy allows the Restate Cloud IAM identity to assume the invoker role, only on behalf of the specified environment ID.
Once you have created the invoker role, you can register your Lambda-backed service(s) with your Restate environment by specifying the role to be assumed:
```shell theme={null}
restate deployments register --assume-role-arn
```
#### Using AWS CDK
You can use AWS CDK together with the [Restate CDK construct library](https://www.npmjs.com/package/@restatedev/restate-cdk) to deploy
Lambda handlers, manage the invoker role, and automatically register Lambda-backed services with a Restate (Cloud) environment.
Here is an example CDK stack that deploys a Lambda function and registers it with Restate Cloud:
```ts expandable {"CODE_LOAD::https://raw.githubusercontent.com/restatedev/examples/refs/heads/main/typescript/integrations/deployment-lambda-cdk/lib/lambda-ts-cdk-stack.ts?remove_comments"} theme={null}
import * as restate from "@restatedev/restate-cdk";
import * as cdk from "aws-cdk-lib";
import * as lambda from "aws-cdk-lib/aws-lambda";
import * as lambda_nodejs from "aws-cdk-lib/aws-lambda-nodejs";
import * as secrets from "aws-cdk-lib/aws-secretsmanager";
import { Construct } from "constructs";
export class LambdaTsCdkStack extends cdk.Stack {
constructor(scope: Construct, id: string, props: cdk.StackProps) {
super(scope, id, props);
const handler = new lambda_nodejs.NodejsFunction(this, "GreeterService", {
runtime: lambda.Runtime.NODEJS_20_X,
entry: "lib/lambda/handler.ts",
architecture: lambda.Architecture.ARM_64,
bundling: {
minify: true,
sourceMap: true,
},
});
if (!process.env.RESTATE_ENV_ID || !process.env.RESTATE_API_KEY) {
throw new Error(
"Required environment variables RESTATE_ENV_ID and RESTATE_API_KEY are not set, please see README.",
);
}
const restateEnvironment = new restate.RestateCloudEnvironment(this, "RestateCloud", {
environmentId: process.env.RESTATE_ENV_ID! as restate.EnvironmentId,
apiKey: new secrets.Secret(this, "RestateCloudApiKey", {
secretStringValue: cdk.SecretValue.unsafePlainText(process.env.RESTATE_API_KEY!),
}),
});
const deployer = new restate.ServiceDeployer(this, "ServiceDeployer");
deployer.deployService("Greeter", handler.currentVersion, restateEnvironment);
new cdk.CfnOutput(this, "restateIngressUrl", { value: restateEnvironment.ingressUrl });
}
}
```
View an example of deploying to AWS Lambda with SDK for your SDK here: [TS](https://github.com/restatedev/examples/tree/main/typescript/integrations/deployment-lambda-cdk), [Go](https://github.com/restatedev/examples/tree/main/go/integrations/go-lambda-cdk), [Java](https://github.com/restatedev/examples/tree/main/java/integrations/java-gradle-lambda-cdk), [Kotlin](https://github.com/restatedev/examples/tree/main/kotlin/integrations/kotlin-gradle-lambda-cdk)
* The `RESTATE_ENV_ID` can be found in the Restate Cloud UI in the top left corner when you select your environment.
This ID starts with `env_`.
* For the `RESTATE_AUTH_TOKEN`, create an API key via `Developers` tab of the Restate Cloud UI and give it `Full` permissions.
The `RestateCloudEnvironment` automatically creates an IAM role with an appropriate trust policy for the matching Restate Cloud environment. The `ServiceDeployer` construct automatically grants this role permission to invoke any AWS Lambda functions registered with the environment. For more details, consult the relevant [Restate CDK](https://www.npmjs.com/package/@restatedev/restate-cdk) constructs' API documentation.
The CDK also registers your service with Restate Cloud, so no need to do this manually.
If something isn't working, the environment logs in the Cloud UI may help you find the issue.
## Services in private environments
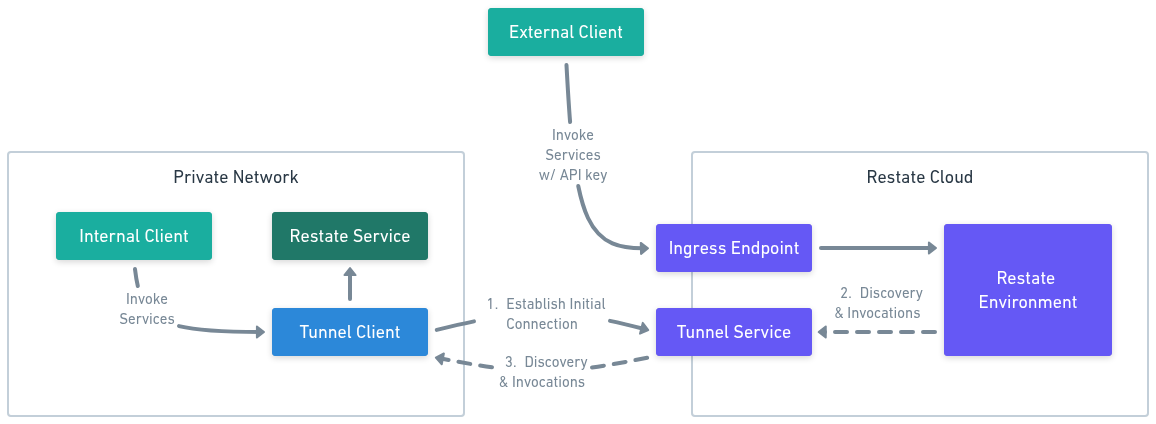
You can connect services running in a locked-down private environment to Restate Cloud using a secure tunnel.
This tunnel allows you to expose your services to Restate Cloud without opening up ports to the public internet.
It also acts as an authenticating proxy, making it appear as if your Restate Cloud environment is inside your private network.
The tunnel lets you use native access control mechanisms, like VPC Security Groups and Kubernetes network policies, to manage access to your Cloud environment. It also lets you control connections from the Cloud environment to the rest of your network by restricting which internal services the tunnel client can connect to.
If you are running on Kubernetes, then you can [use the Restate Operator to create a `RestateCloudEnvironment`](/cloud/connecting-services#kubernetes-services).
This tunnel automatically sets up the tunnel for you.
You only need to run the tunnel client manually if you’re not running on Kubernetes.
### Set up a secure tunnel
The tunnel can be hosted as a cloud VM in your VPC, a sidecar to your service, or a dedicated pod in your container orchestrator.
You can deploy multiple copies for redundancy.
To run the tunnel:
```bash theme={null}
# export RESTATE_ENVIRONMENT_ID=env_...
# export RESTATE_BEARER_TOKEN=key_...
# export RESTATE_TUNNEL_NAME=test-tunnel
# export RESTATE_SIGNING_PUBLIC_KEY=publickeyv1_...
# export RESTATE_CLOUD_REGION=eu
docker run \
-e RESTATE_ENVIRONMENT_ID \
-e RESTATE_BEARER_TOKEN \
-e RESTATE_TUNNEL_NAME \
-e RESTATE_SIGNING_PUBLIC_KEY \
-e RESTATE_CLOUD_REGION \
-p 8080:8080 \
-p 9090:9090 \
-p 9070:9070 \
-it ghcr.io/restatedev/restate-cloud-tunnel-client:latest
```
* `RESTATE_ENVIRONMENT_ID` is the environment id (including the `env_` prefix).
* `RESTATE_BEARER_TOKEN` is the API key you created in step 1.
* `RESTATE_TUNNEL_NAME` is a name for the tunnel. Choose a unique DNS-friendly tunnel name, e.g. `prod-tunnel`.
* `RESTATE_SIGNING_PUBLIC_KEY` is the public key you copied from the Cloud UI in step 1.
* `RESTATE_CLOUD_REGION` is the region of your Restate Cloud environment, e.g. `eu` or `us`.
* You can run `latest` or pin the current version, e.g. `0.4.0`
* The health check URL is at `:9090/health`
The tunnel client exposes the following ports
* `9090` tunnel's own health status
* `8080` Restate Ingress (authenticating proxy)
* `9070` Restate Admin API (authenticating proxy)
In addition to exposing local services to Restate Cloud, by default the tunnel client will also serve unauthenticated ingress and admin endpoints from Restate Cloud on its local 8080 and 9080 ports. This behaviour can be disabled with `RESTATE_REMOTE_PROXY=false`. If left enabled, be careful to restrict access to these ports; access to them is equivalent to having the configured `RESTATE_BEARER_TOKEN`.
[Learn more about how the tunnel works below.](/cloud/connecting-services#how-does-the-tunnel-work)
### Register your service
If your setup is correct, you can now register your service with the Restate Cloud environment:
```bash theme={null}
restate deployments register --tunnel-name
```
You can now invoke your service as usual.
### How does the tunnel work
* Restate CLI is communicating with your Restate environment at `https://*.eu.restate.cloud:9070` using your user ID token and asks the admin API to perform a discovery at a special tunnel URL.
* The Restate Cloud end of the tunnel receives the request from your environment and forwards the traffic to the tunnel container.
* The tunnel container is forwarding the traffic to the Restate service endpoint.
## Advanced topics
### Client-side encryption
You can optionally configure client-side encryption, which makes your data opaque to Restate Cloud.
In this case, the SDK encrypts journal entries after serializing them but before sending them to Restate Cloud.
**What is encrypted?** Only the following journal entries are encrypted:
* The input and output parameters to the handler
* `ctx.run` success results
* RPC calls parameters and return values (for service-to-service invocations)
* State values
* Awakeables and Durable Promise results
It is not possible to encrypt any other journal entries.
**How to enable encryption?** You need to implement a [`JournalValueCodec`](https://github.com/restatedev/sdk-typescript/blob/main/packages/restate-sdk-core/src/entry_codec.ts#L26) and provide it to the SDK when creating the endpoint.
Currently, this feature is only available in the TypeScript SDK.
Have a look at a reference implementation that uses Amazon's KMS to manage encryption keys.
 ## Advanced topics
### Client-side encryption
You can optionally configure client-side encryption, which makes your data opaque to Restate Cloud.
In this case, the SDK encrypts journal entries after serializing them but before sending them to Restate Cloud.
**What is encrypted?** Only the following journal entries are encrypted:
* The input and output parameters to the handler
* `ctx.run` success results
* RPC calls parameters and return values (for service-to-service invocations)
* State values
* Awakeables and Durable Promise results
It is not possible to encrypt any other journal entries.
**How to enable encryption?** You need to implement a [`JournalValueCodec`](https://github.com/restatedev/sdk-typescript/blob/main/packages/restate-sdk-core/src/entry_codec.ts#L26) and provide it to the SDK when creating the endpoint.
Currently, this feature is only available in the TypeScript SDK.
## Advanced topics
### Client-side encryption
You can optionally configure client-side encryption, which makes your data opaque to Restate Cloud.
In this case, the SDK encrypts journal entries after serializing them but before sending them to Restate Cloud.
**What is encrypted?** Only the following journal entries are encrypted:
* The input and output parameters to the handler
* `ctx.run` success results
* RPC calls parameters and return values (for service-to-service invocations)
* State values
* Awakeables and Durable Promise results
It is not possible to encrypt any other journal entries.
**How to enable encryption?** You need to implement a [`JournalValueCodec`](https://github.com/restatedev/sdk-typescript/blob/main/packages/restate-sdk-core/src/entry_codec.ts#L26) and provide it to the SDK when creating the endpoint.
Currently, this feature is only available in the TypeScript SDK.